Configure Universal Alerts

Stay allows users to configure alerts that provides notifications to users who are logged to Stay and via email. For example, alerts can be configured to notify the front desk agents when an in-house guest’s birthday falls during the reservation’s timeframe.

Feature Setting

The following feature setting must be enabled to allow users to configure the system and email notifications to alert users regarding various events.

  • Name: Universal Alerting

  • Value: Must be enabled

  • Comments: License is not required

Property Setting

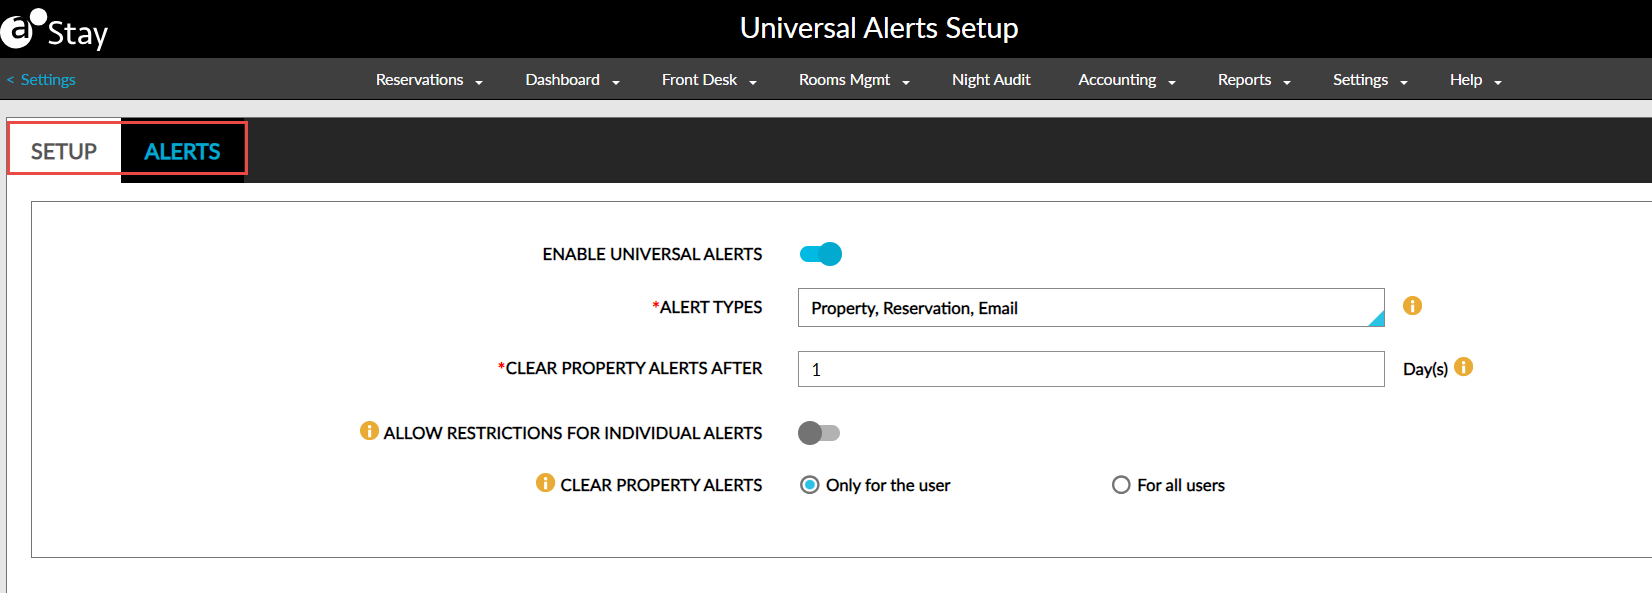
The following settings must be enabled in the Setup tab of the Universal Alerts Setup screen (All Settings à General à Universal Alerts) by the property for users to create alerts:

Settings

Description

Enable Universal Alerts

  • This flag is disabled by default.

  • Users must enable this flag to configure the other settings on this screen.

Alert Types

This is a multi-select drop-down list that displays the following options: Property, Reservation, and Email.

  • Property Alerts: These alerts are displayed in the bell icon present on the top right corner of the screen.

  • Reservation Alerts: Displayed in the X badge in the Reservation Summary section of the reservation.

  • Email Alerts: These alerts are sent to the specified email addresses.

This is a mandatory field that does not have any option selected by default.

Clear Property Alerts After

  • This field allows users to configure the number of days after which the property alerts must be cleared.

  • The default number of days is set as 7.

  • Users can select a maximum of 10 days.

  • This is a mandatory field.

  • When users enter the value as 0, or enter a value greater than 10, the following message is displayed: Maximum range exceeded, or Minimum range not met.

Allow Restrictions for Individual Alerts

  • This flag is disabled by default.

  • When enabled, users can set up restrictions for individual alerts when configuring them.

  • It is an optional field.

Clear Property Alerts

Allows users to select how the property alerts must be cleared. Users can select from the following options:

  • Only for the user: The property alerts will be cleared only for the user clearing them.

  • For all users: The property alerts will be cleared for all users who have received the alerts.

A screenshot of a computer

Description automatically generated

Permissions

The following new permission has been introduced to allow users to modify the universal alerts settings in the Setup tab of the Universal Alerts Setup screen:

  • Stay_SetupUniversalAlerts

This permission is provided to the following roles by default:

  • System Administrator

  • Stay Hotel Manager

Users without this permission cannot modify the universal alerts settings.

The following new permission has been introduced to allow users to configure alerts at the customer level. Users with this permission can add, modify, or inactivate alerts at the customer level and property level:

  • Stay_WriteTenantUniversalAlerts

This permission is provided to the following roles by default:

  • System Administrator

  • Stay Hotel Manager

The following new permission has been introduced to allow users to configure alerts at the property level.

  • Stay_WritePropertyUniversalAlerts

Users with this permission can add, modify, or inactivate alerts at the property level. Users with this permission can view the alerts configured at the customer level but cannot modify them.

This permission is provided to the following roles by default:

  • System Administrator

  • Stay Hotel Manager

  • Department Manager

Users without these permissions can only view the Setup and Alerts sections on the Universal Alerts Setup screen.

Creating Alerts

Users can create new alerts by clicking the Add button on the Alerts tab of the Universal Alerts Setup screen. When clicked, the Add Alert screen appears that displays the following fields:

Field

Description

Active Checkbox

  • This checkbox is enabled by default.

  • When disabled, the created alerts are deactivated.

Start and End Dates

  • Users can select a start date for the alert. The dates prior to the current property date cannot be selected. This is a mandatory field.

  • Users can select an end date for the alert. This is an optional field.

Allow Properties to Deactivate

  • This flag is disabled by default.

  • This flag is displayed only when the alerts are configured at the customer level.

  • When enabled, the alerts created at the customer level can be deactivated by the properties.

Event Name

  • This is a mandatory field that allows users to enter a name for the event.

  • Users can enter a maximum of 100 characters, including alphanumeric and special characters.

  • When users enter more than 100 characters, the following message is displayed: Exceeds 100 characters.

Event Description

  • This is an optional field that allows users to enter a description for the event.

  • Users can enter a maximum of 300 characters, including alphanumeric and special characters.

  • When users enter more than 300 characters, the following message is displayed: Exceeds 300 characters.

Event Type

This is a mandatory field that allows users to select from the following options: Reservations, Groups, Guest Profiles, Housekeeping, and Reports.

Alert Trigger

This is a mandatory single select drop-down list that allows users to select a trigger option based on the event type selected:

Event Type

Alert Trigger

Description

Reservations

Real Time

The alert is triggered when the event occurs.

Creation

The alert is triggered when the reservation is created.

Check In

The alert is triggered when the reservation checks in.

Check Out

The alert is triggered when the reservation checks out.

Arrival Day

The alert is triggered on the arrival date of the reservation after the date roll from the previous day.

Departure Day

The alert is triggered on the departure date of the reservation after the date roll from the previous day.

Groups

Real Time

The alert is triggered when the event occurs.

Creation

The alert is triggered when the group is created.

Start Day

The alert is triggered on the start date.

End Day

The alert is triggered on the end date.

Guest Profiles

Real Time

The alert is triggered when the event occurs.

Creation

The alert is triggered when the profile is created.

Housekeeping

Real Time

The alert is triggered when the event occurs.

Reports

Real Time

The alert is triggered when the event occurs.


Priority

Allows users to select from the following options:

  • Low

  • Medium

  • High

Rules

Match Rules

Users can select from the following options:

  • All of the following: When selected, all the rules configured must match for the event to be triggered. This option is selected by default.

  • Any of the following: When selected, any one rule must match for the event to be triggered.

A maximum of three rules can be created. Each rule can have a maximum of 5 conditions.

Match Conditions

Users can select from the following options:

  • All of the following: When selected, all the conditions configured must match for the event to be triggered. This option is selected by default.

  • Any of the following: When selected, any one condition must match for the event to be triggered.

Conditions contain the following:

  • Field: Users can select a field. For example, rate plan, room type.

  • Operator: Users can select an operator. For example, all, equals, contains.

  • Value: Users can select a value. For example, searched, selected, entered.

Property Alert

Users must select values for the following fields. Only one alert is sent when a user belongs to multiple departments and has access to multiple roles.

Roles

This is a multi-select drop-down list that allows users to select the required roles.

Departments

This is a multi-select drop-down list that allows users to select the required departments.

Users

This is a multi-select drop-down list that allows users to select the required users.

Alert Message

Users can select the following keywords for the alert message:

  • First Name

  • Last Name

  • Alias

  • Title

  • Group Name

  • No. of Nights

  • Arrival Date

  • Departure Date

  • Date of Birth

  • Anniversary

  • VIP Level

  • Reservation ID (hyperlink)

  • Group ID (hyperlink)

  • Guest Profile ID (hyperlink)

  • Scheduled Report Name

Template

This is mandatory field that allows users to enter a maximum of 200 characters including alphanumeric and special characters. When users enter more than 200 characters, the following message is displayed: Maximum length exceeded.

Reservation Alert

Active Checkbox

  • This checkbox is enabled by default.

  • When disabled, the created alerts are deactivated.

Alert Message

List of Keywords

Users can select the following keywords for the alert message:

  • First Name

  • Last Name

  • Alias

  • Title

  • Group Name

  • No. of Nights

  • Arrival Date

  • Departure Date

  • Date of Birth

  • Anniversary

  • VIP Level

  • Reservation ID (hyperlink)

  • Group ID (hyperlink)

  • Guest Profile ID (hyperlink)

  • Scheduled Report Name

Template

This is mandatory field that allows users to enter a maximum of 200 characters including alphanumeric and special characters. When users enter more than 200 characters, the following message is displayed: Maximum length exceeded.

Email Alert

If multiple alerts are triggered for the event, they will be grouped and listed in the same email.

For example, a list of guest birthdays overlapping the reservation being alerted on the day of arrival will be sent as one email with the alerts listed within.

Active Checkbox

  • This checkbox is enabled by default.

  • When disabled, the created alerts are deactivated.

Email Address

This is a mandatory field that allows users to enter multiple email addresses separated by a comma.

Email Body

  • This is a mandatory field that allows to configure the message to be displayed in the body of the email.

  • Users can enter a maximum of 500 characters including alphanumeric and special characters.

  • When users enter more than 500 characters, the following message is displayed: Exceeds 500 characters.

Alert Message

List of Keywords

Users can select the following keywords for the alert message:

  • First Name

  • Last Name

  • Alias

  • Title

  • Group Name

  • No. of Nights

  • Arrival Date

  • Departure Date

  • Date of Birth

  • Anniversary

  • VIP Level

  • Reservation ID (hyperlink)

  • Group ID (hyperlink)

  • Guest Profile ID (hyperlink)

  • Scheduled Report Name

Template

This is mandatory field that allows users to enter a maximum of 200 characters including alphanumeric and special characters. When users enter more than 200 characters, the following message is displayed: Maximum length exceeded.

Restrictions

Allowed Days

  • This is a mandatory multi-select drop-down list that allows users to select the days for the alert.

  • No option is selected by default.

Allowed Time Range

Users can select the allowed time range for the restrictions in the From and To fields.

A screenshot of a computer

Description automatically generated

A screenshot of a computer

Description automatically generated

A screenshot of a computer

Description automatically generated

When users select the Guests/Age Category Count field in a rule, a new condition in the rule will be created automatically with the field as Age Category. The Guests/Age Category Count fields must always be chosen as a pair. Once selected, users must select the age category for which the count needs to be checked in this rule. Only one pair of them is allowed in a rule. Once they are selected in a rule, user should not be able to select them again in the same rule. 

When Custom Field Data is selected in a rule, a new rule will be created automatically with the field as Custom Field. Users must select the custom field for which the data needs to be checked in this rule. Custom Field Data and Custom Field will always come in pairs if Custom Field Data is selected. Only one pair of them is allowed in a rule. Once they are selected in a rule, user should not be able to select them again in the same rule. 

When users select Key Revoked or Discrepant Room fields, no operator value needs to be selected further.

For the following fields, the Operator value should be selected as In so that users can select the required options in the Value column:

  • Payment Method

  • Age Category

  • Pets

  • Reservation Status

  • Group Status

  • Custom Field

Users can save the alerts by clicking the Save button. By default, the alerts are configured at the property level. Users can configure alerts at the customer level by clicking the Configure for Tenant button.

The following columns are displayed on the Alerts tab for the created alerts:

Column

Description

Event Name

Displays the name of the event.

Event Type

Displays the event type, such as, reservations, groups.

Alert Types

Displays the type of the alert, such as, property, reservation, email.

Level

Displays if the alert was created at the tenant or property level.

Status

Displays if the status of the alert is active or inactive.

By default, only the active alerts are listed sorted alphabetically based on the event name. The Show Inactive checkbox must be enabled to display the inactive records. Users can sort the records in all the columns. The records can be filtered based on the following criteria:

  • Event Type: Users can choose from the following event types:

    • Reservations

    • Groups

    • Guest Profiles

    • Housekeeping

    • Reports

  • Alert Type: Users can choose from the following alert types:

    • Reservation

    • Property

    • Email

  • Level: Users can choose from the following levels:

    • Tenant

    • Property

  • Status: Users can choose from the following status

    • Active

    • Inactive

A screenshot of a computer

Description automatically generated

Users can search records using the event names. The details of the alerts can be modified by clicking the event name hyperlink. When clicked, the Update Alerts screen appears that allows users to modify the required details.

Viewing Property Alerts

The bell icon at the top-right corner of the screen displays the count of the new notifications. When users click the bell icon, the Notifications panel is displayed. The notifications are stacked from the newest to the oldest based on highest to the lowest priority. The alerts are grouped based on the following:

  • The notifications are grouped by event name and displayed

  • All the alerts triggered based on an alert are grouped together and displayed

  • The total number of alerts under each alert is displayed

A screenshot of a computer

Description automatically generated

The number on the bell icon is based on the total number of groups by event name. When users click the bell icon, the count remains the same.

When the notification’s link (if added in the template) is clicked, the user is navigated to the respective screen. The See all alerts hyperlink at the end of the Notifications panel allows users to view all the notifications in an expanded view. When clicked, the Alerts screen appears that displays all the alerts. Users can perform the following operations on this screen:

  • Users can click the hyperlinks on the alerts if available, for navigation.

  • Alerts can be cleared.

  • Alerts can be filtered by alert names.

  • Users can search alerts using the alert names.

A screenshot of a computer

Description automatically generated

Users can also remove alerts using the remove option provided for each alert or using the Remove all alerts option. Based on the alert settings configured at the property, the alerts notifications are cleared for the Property Alerts.

Viewing Alerts in the Reservation Summary Section

The alerts pertaining to a reservation are displayed when users click the Alerts badge on the Reservation Summary section of the reservation. When clicked, the Alerts screen appears that displays the following tabs:

  • Open: Displays all the open alerts for the reservation.

  • Archive: Displays all the alerts marked as Archived.

A screenshot of a computer

Description automatically generated

A screenshot of a computer

Description automatically generated

Users can archive the alerts that are displayed in the Open tab. Once the alert for a reservation is addressed, it can be archived. Users can filter and search records using the alert name on this screen.

Viewing Tasks

A new icon has been introduced to notify the tasks created by users. Previously, the tasks were notified by a bell icon.

A screenshot of a computer

Description automatically generated

Configuring Universal Alerts for Enrollment

Users can configure universal alerts for the Reservation and Profile event types for the field, New Loyalty Program Enrollment. When this field is selected, no additional Operator and Value is required to be configured. When a guest enrolls for a loyalty program, based on the configurations made in the Universal Alert Setup screen (All Settings à General à Universal Alerts), the alerts are displayed to the users.

A screenshot of a computer

Description automatically generated

Universal Alerts Log Screen

The Universal Alerts Log screen (Reports à Universal Alerts Log) displays the following details for the created alerts:

Column

Description

Event Name

Displays the event name.

Event Type

Displays the event type.

Alert Type

Displays the type of alert.

Recipients

Displays the list of roles, departments, users, or email addresses of the recipients of the alerts. This field is marked as NA for reservation alerts.

Date

Displays the date and time of the alert.

Account

  • If the alert is triggered for a reservation, the confirmation number of the reservation is displayed.

  • If the alert is triggered for a group, the group code is displayed.

Name

Displays the name of the account for which the alert was triggered.

  • For reservation, the guest name is displayed.

  • For profile, the profile name is displayed.

  • For group, the group name is displayed.

  • For report, the name of the report is displayed.

A screenshot of a computer

Description automatically generated

Users can generate the logs by selecting values for the following parameters:

  • Date Range

  • From

  • To

  • Event Name

  • Alert Type

The logs can be sorted, filtered, and searched. Records for the alerts that are created/modified are also created in the Audit Log screen.